How to Export Excel Data to Text Files in Excel

This post will explain how to export Excel data to text files in Excel using VBA code. This post will show you how to export one sheet to text files in Excel, which can be useful if you need to extract data from Excel and use it in another program that requires a text file format.

You can easily select the data you want to export, specify a file name and location for the text file, and then generate a text file that contains the data in the format you need.

Export one Single Worksheet to Text File

If you want to export a single Excel sheet to a text file, follow these steps:

Step1: Open the Excel workbook that contains the sheet you want to export.

Step2: Click on the sheet you want to export.

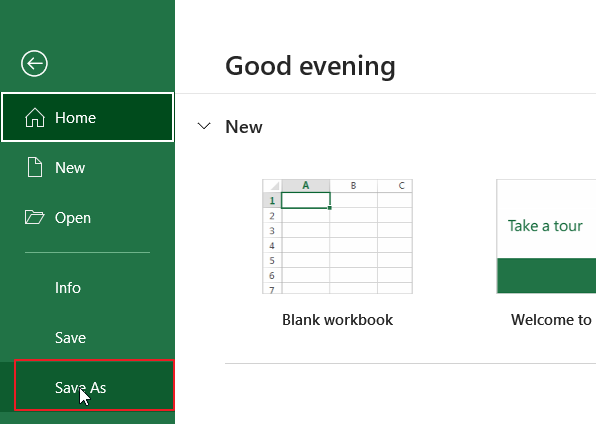
Step3: Click on the “File” tab in the ribbon menu.

Step4: Click on “Save As” in the left-hand menu.

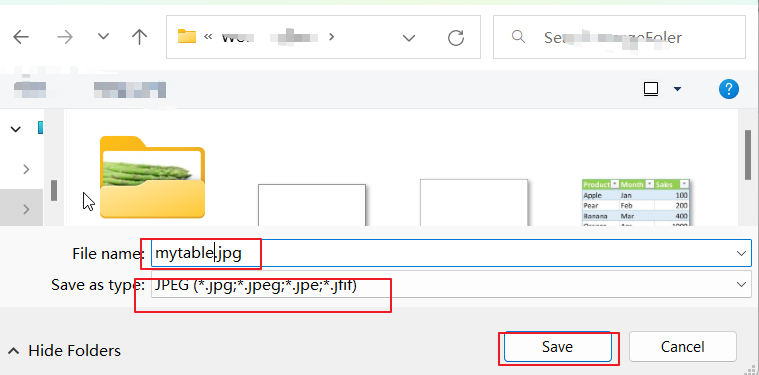
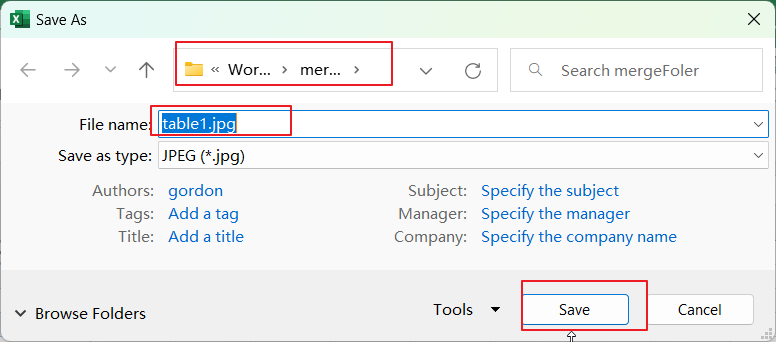
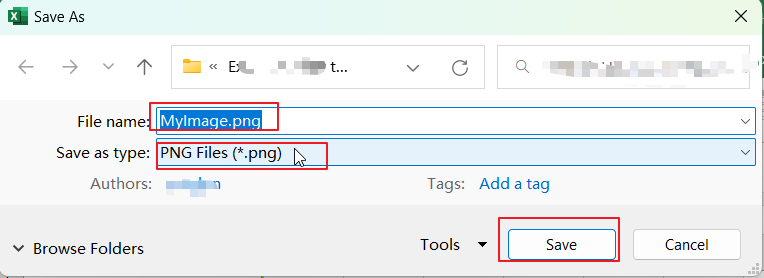
Step5: In the “Save As” dialog box, choose the location where you want to save the text file.

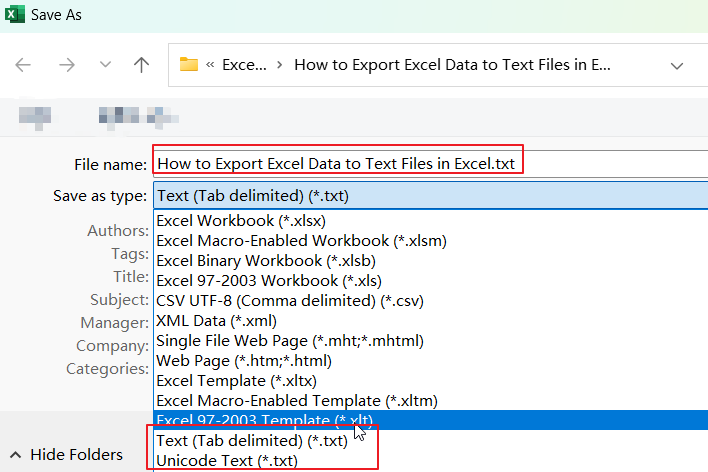
Step6: In the “Save as type” dropdown menu, select “Text (Tab delimited) (*.txt)“.

How to Export Excel Data to Text Files in Excel1.png

Step7: Click on the “Save” button.

Export one Column or Selection to Text File with VBA Code

You can use VBA code to export a selection or one column to a text file in Excel. Here are the steps:

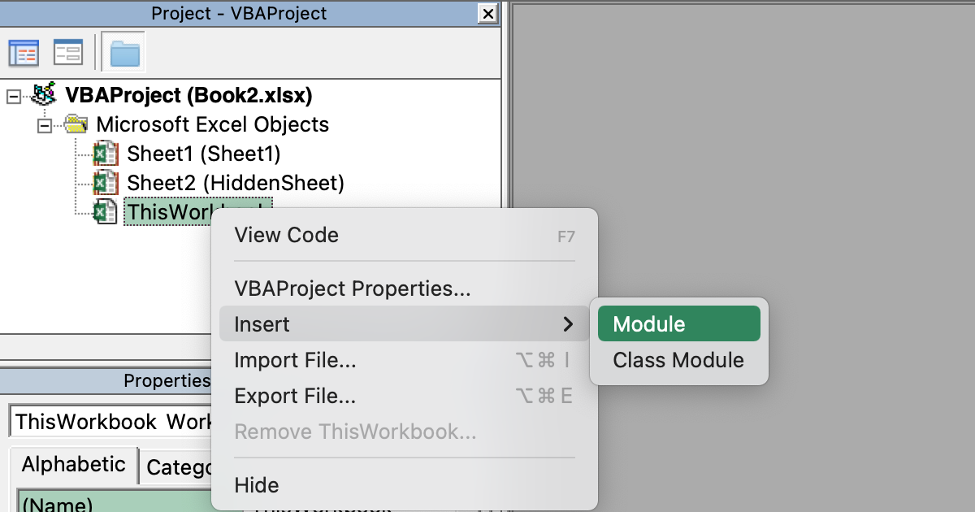
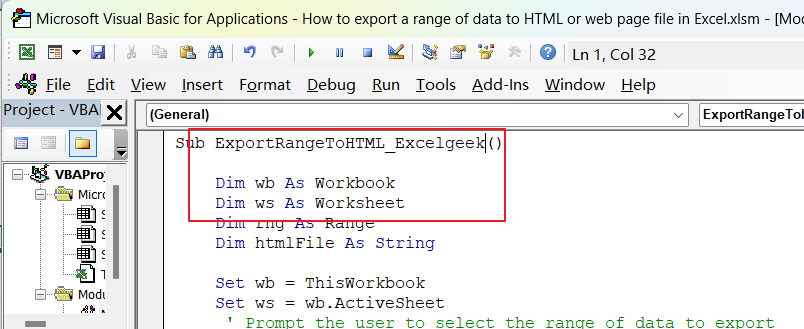
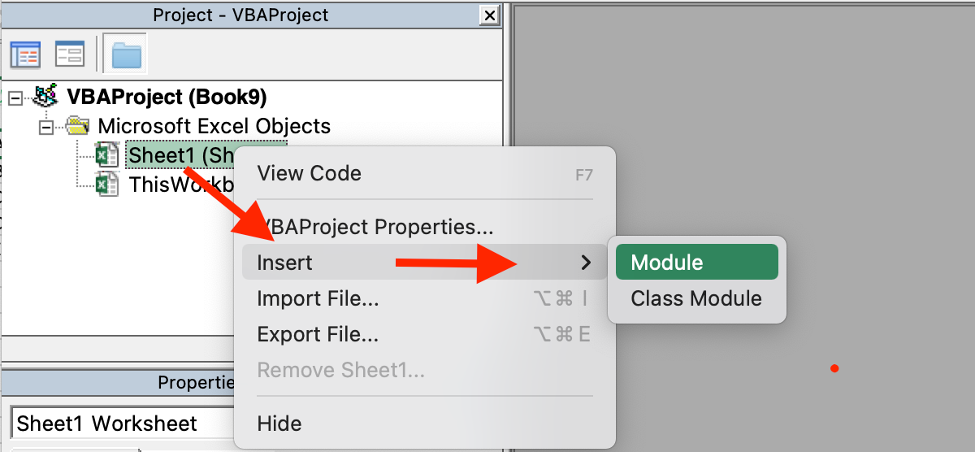
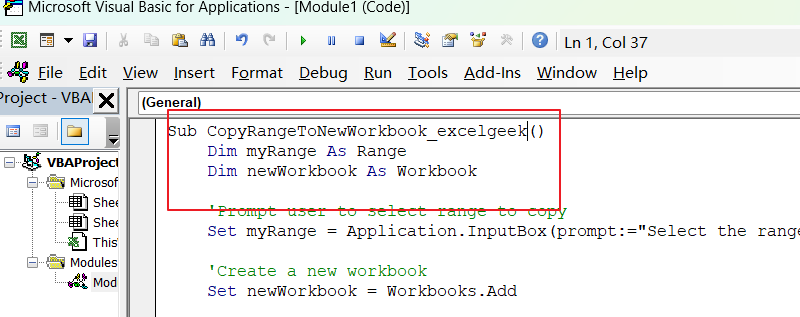
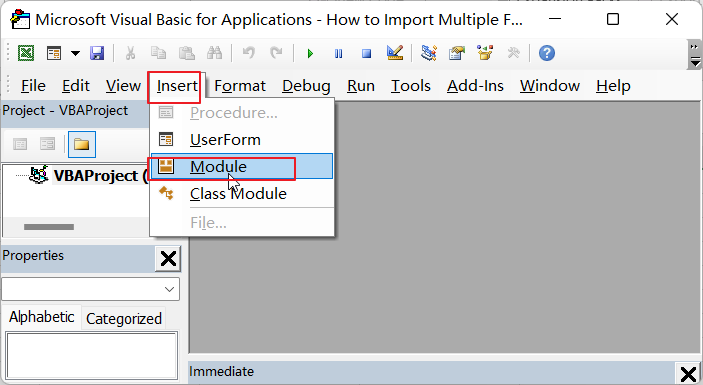
Step1: Press “Alt + F11” on your keyboard. This will open the Visual Basic Editor window.

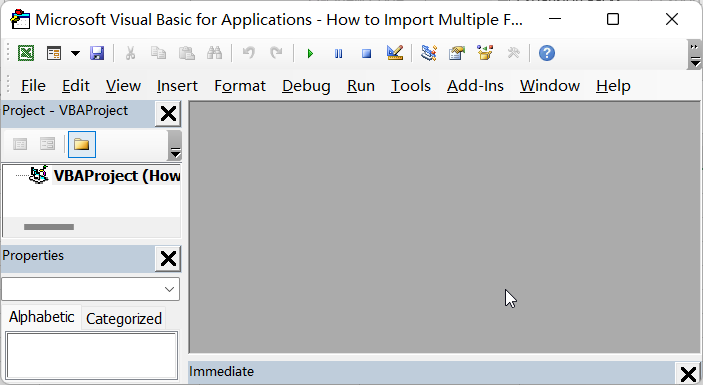
Step2: In the Visual Basic Editor window, select “Insert” from the top menu and choose “Module” to create a new module.

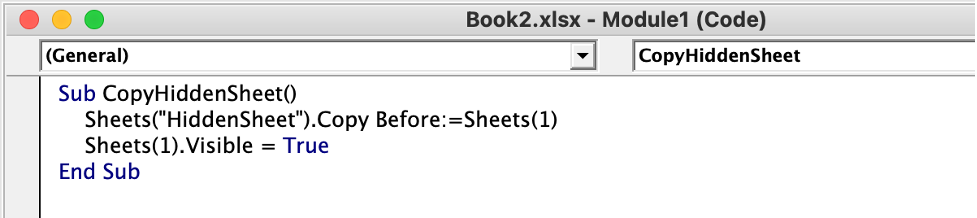
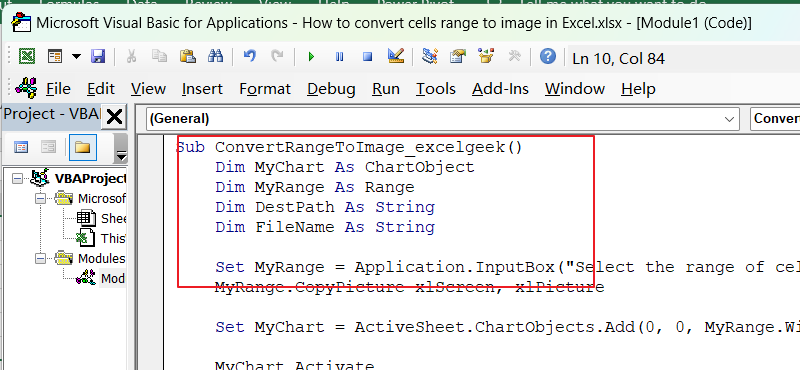
Step3: Copy and paste the following VBA code into the new module. Save the workbook with the VBA code.

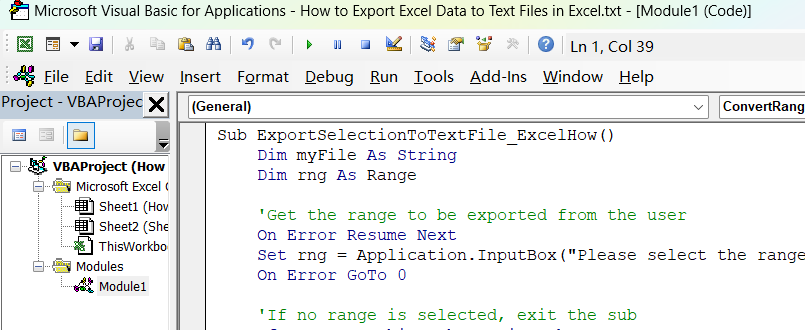
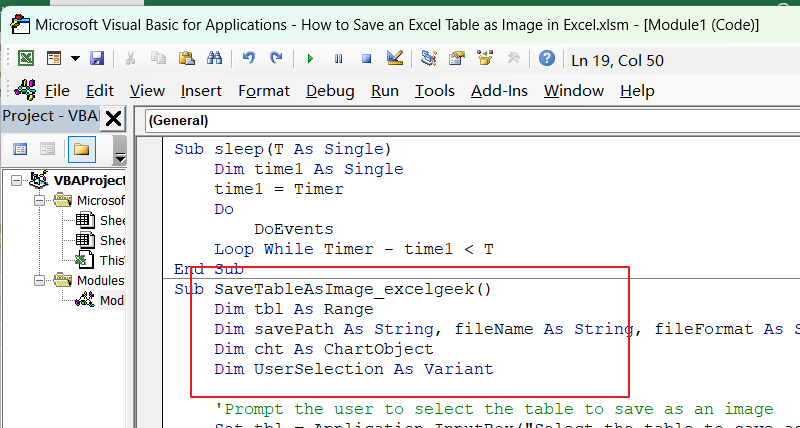
Sub ExportSelectionToTextFile_ExcelHow()
    Dim myFile As String
    Dim rng As Range
    
    'Get the range to be exported from the user
    On Error Resume Next
    Set rng = Application.InputBox("Please select the range to be exported:", Type:=8)
    On Error GoTo 0
    
    'If no range is selected, exit the sub
    If rng Is Nothing Then Exit Sub
    
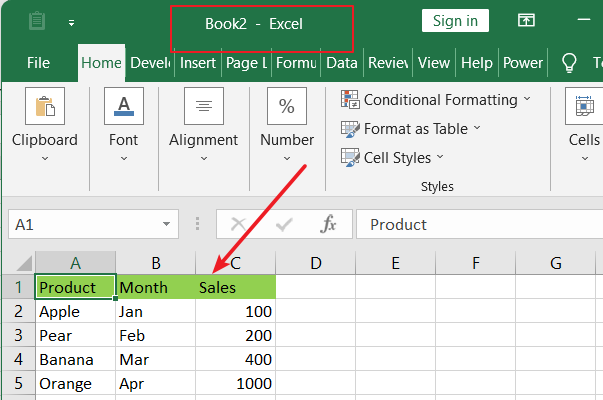
    'Create a new workbook and copy the selected range to it
    Dim wb As Workbook
    Set wb = Workbooks.Add
    rng.Copy Destination:=wb.Sheets(1).Range("A1")
    
    'Get the file name and location for the text file
    myFile = Application.GetSaveAsFilename(InitialFileName:="ExportedData.txt", FileFilter:="Text Files (*.txt), *.txt")
    
    'If the user cancels the file selection, exit the sub
    If myFile = "False" Then Exit Sub
    
    'If the file name is not valid, display an error message and exit the sub
    If Len(myFile) = 0 Then
        MsgBox "Invalid file name. Please select a valid file name and location.", vbExclamation, "Export to Text File"
        Exit Sub
    End If
    
    'Save the new workbook as a text file and close it
    wb.SaveAs FileName:=myFile, FileFormat:=xlText, CreateBackup:=False
    wb.Close SaveChanges:=False
    
    'Display a success message
    MsgBox "Data has been exported to text file successfully!", vbInformation, "Export to Text File"
End Sub

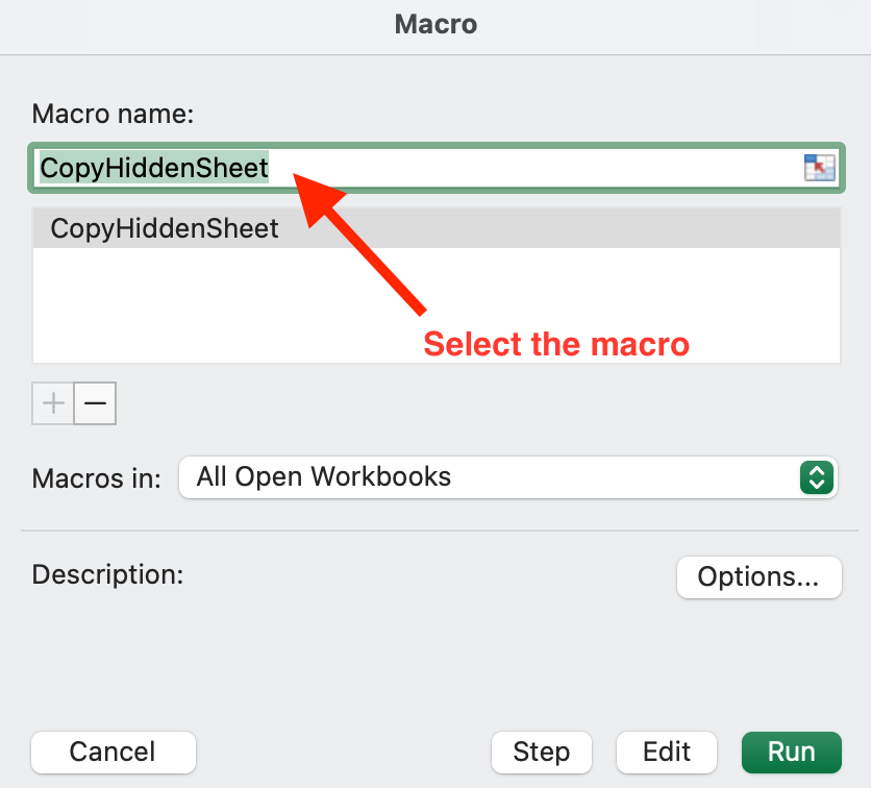
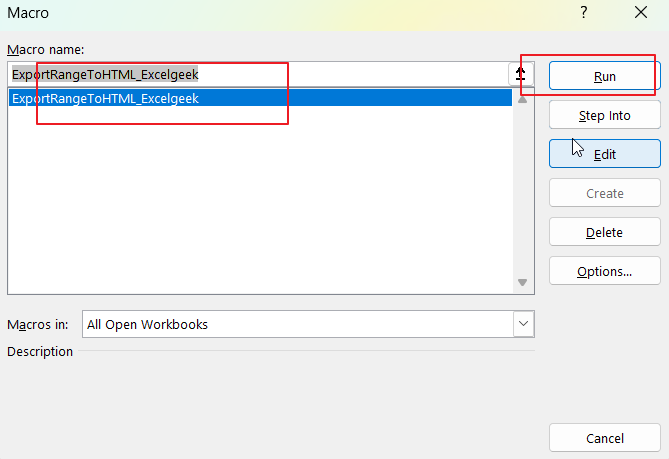
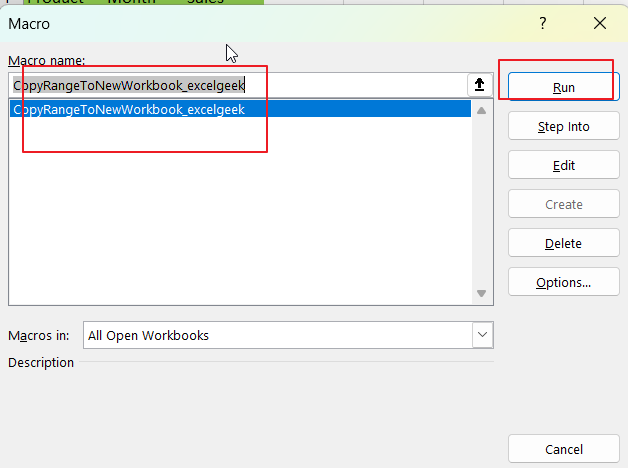
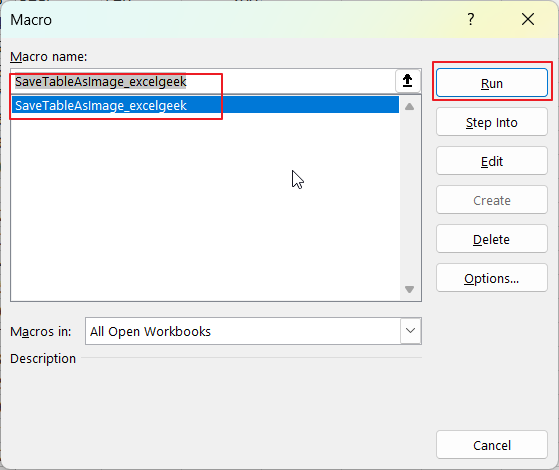
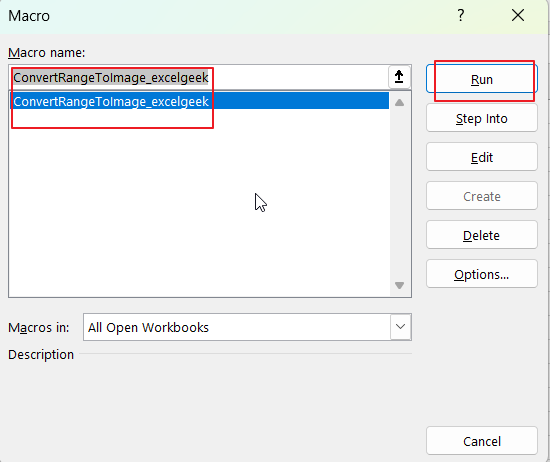
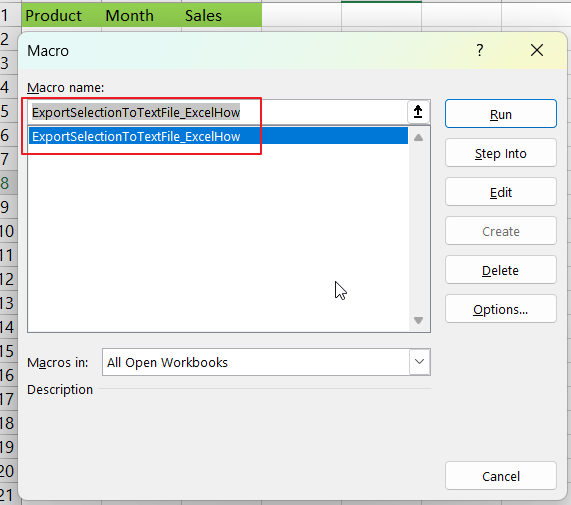
Step4: Press “Alt + F8” to open the Macro dialog box. Select the ” ExportSelectionToTextFile_ExcelHow” macro from the list of macros and click “Run“.

How to Export Excel Data to Text Files in Excel vba 2.png

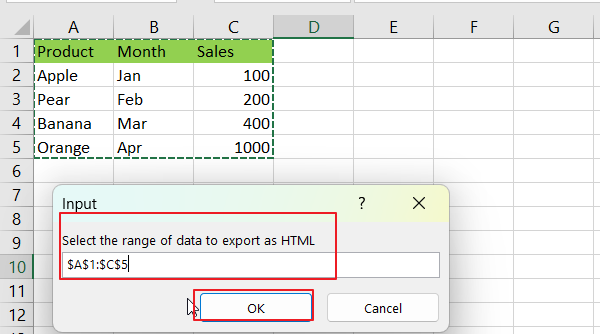
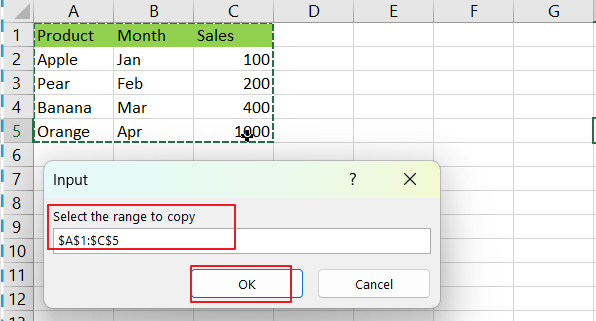
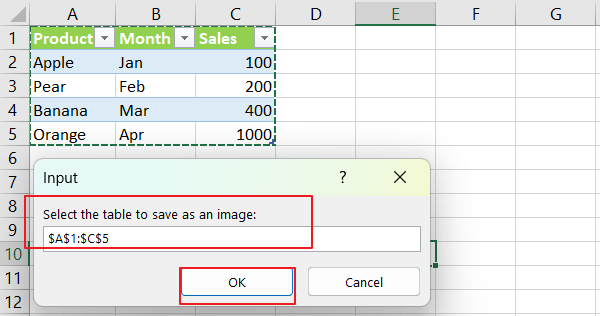
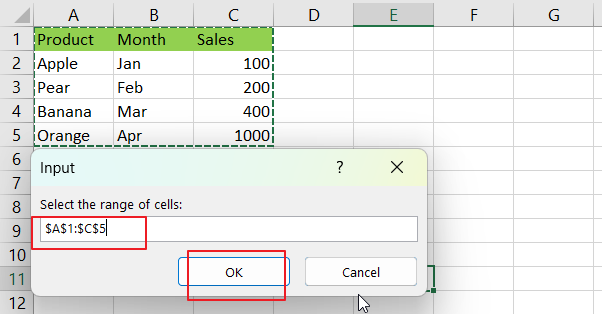
Step5: select the range to be exported

How to Export Excel Data to Text Files in Excel vba 3.png

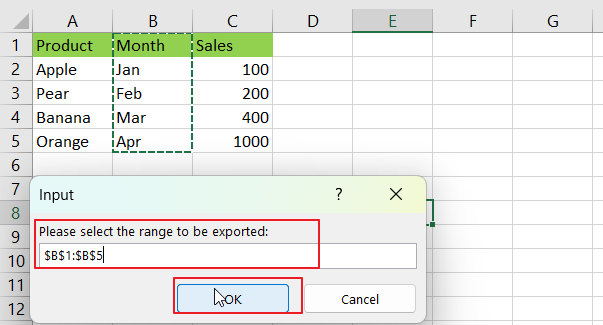
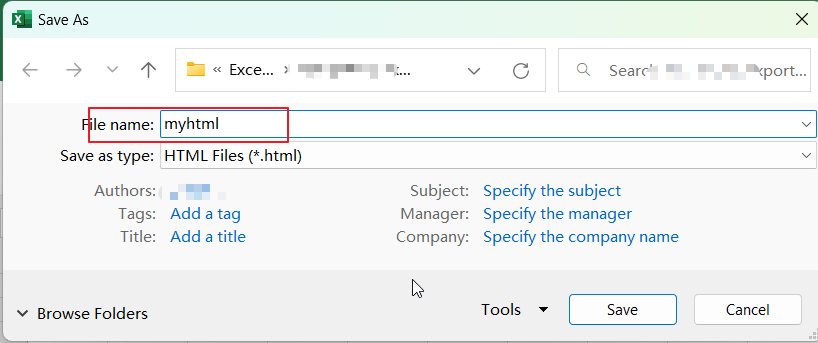
Step6: select a file name and location for the text file to be exported.

How to Export Excel Data to Text Files in Excel vba 4.png

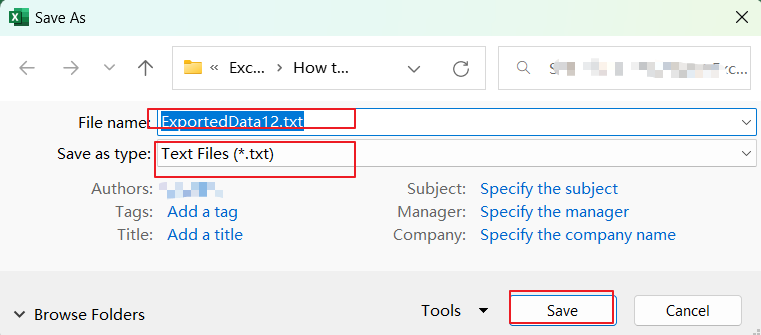
Step6: Click “Save” to export the selected range to the text file.

How to Export Excel Data to Text Files in Excel vba 5.png

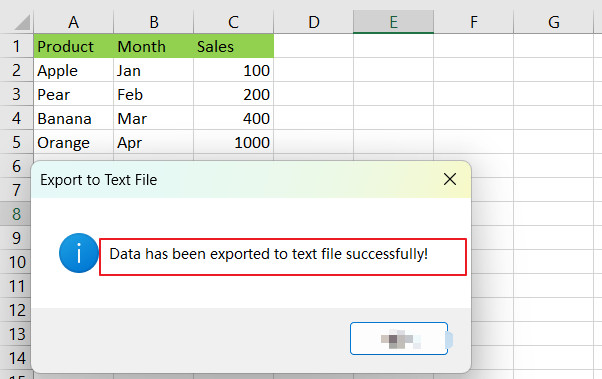
The selected range should now be exported to a text file in the location that you specified.

Video: Export Excel Data to Text Files This

This video will demonstrate how to export Excel data to text files in Excel using VBA Code.

How to Copy a Hidden Sheet to a New Visible Sheet in Excel

If a sheet is hidden, it cannot be accessed or edited directly. By copying it to a new visible sheet, you can access and work with the data on that sheet. Copying a hidden sheet to a visible sheet can also help you create a backup of the hidden sheet. This ensures that you have a copy of the data in case the original sheet becomes corrupted or lost.

This article will show you a great way to copy a hidden worksheet to a new worksheet through VBA code without unhiding or accessing the hidden worksheet.

Copy a Hidden Sheet to a New Visible Sheet Through VBA Code

We may want to hide certain worksheets that contain confidential or sensitive information. If we are the owner of these worksheets, we can copy the hidden worksheet in the traditional way, unhide it and create a copy in the workbook. If we are not allowed to access it, we can still copy the hidden worksheet through VBA code and we can update the data on the new copy without editing the original data.

You can use the following steps to copy a hidden sheet to a new visible sheet using VBA code.

Step1: Open the Excel workbook that contains the hidden sheet and press “Alt+F11” to open the “Visual Basic Editor“. You can also click “Visual Basic” on the “Developer” tab in the ribbon.

How to Copy a Hidden Sheet to a New Visible Sheet in Excel 1.png

Step2: In the “Visual Basic Editor“, right-click on the name of the workbook in the “Project Explorer” and select “Insert > Module” to insert a new module.

How to Copy a Hidden Sheet to a New Visible Sheet in Excel 2.png

Step3: In the module, write the following code:

Sub CopyHiddenSheet()
    Sheets("HiddenSheet").Copy Before:=Sheets(1)
    Sheets(1).Visible = True
End Sub

In this example, “HiddenSheet” is the name of the hidden sheet that you want to copy. Change it to the name of the hidden sheet that you want to copy.

How to Copy a Hidden Sheet to a New Visible Sheet in Excel 3.png

Step4: Press “F5” or click the “Run” button to run the code.

How to Copy a Hidden Sheet to a New Visible Sheet in Excel 4.png

This will copy the hidden sheet to a new sheet before the first sheet in the workbook and make it visible.

How to Copy a Hidden Sheet to a New Visible Sheet in Excel 4.png

In this step, if you already closed “Visual Basic Editor“, you can also click the “Macros” on the “Developer” tab in the ribbon to run the “Macro“.

How to Copy a Hidden Sheet to a New Visible Sheet in Excel 6.png

Click “Run” in the “Macro” dialog.

How to Copy a Hidden Sheet to a New Visible Sheet in Excel 6.png

Copy a Hidden Sheet with a Different Name Through VBA Code

In this case the code “Sheets(1).Visible = True” works only for the copy of the first worksheet location. It does not work if the copy is saved in a specific location. If you want to copy the hidden worksheet to a specific location, change the “Before:=Sheets(1)” parameter to the desired worksheet location.

For example, if you want to copy the hidden worksheet to the end of the workbook, change it to “After:=Sheets(Sheet.Count)“. If you want to create a copy after the hidden sheet, change it to “After:=Sheets(“HiddenSheet”)“. This operation will only copy the sheet to a specific location, but will not set it to be visible.

If you want to copy the hidden sheet with a different name, you can write the following code.

Sub CopyHiddenSheet()
    Sheets("HiddenSheet").Copy Before:=Sheets(1)
Sheets(1).Visible = True
    Sheets(1).Name = "New Sheet Name"
End Sub

Here, for the “New Sheet Name“, change it to the name you want to name the copy hidden sheet.

How to Copy a Hidden Sheet to a New Visible Sheet in Excel 8.png

Conclusion

After reading this post, you have gained the skills to copy hidden worksheets to visible worksheets by editing VBA code. With Visual Basic editor, you can see all visible and invisible worksheets. By editing the provided code, you can copy the worksheet you want to copy to any specific location. You can also rename the copied worksheet correctly with the VBA code.

How to Export a Range of Data to HTML or Web Page File in Excel

This post will explain how to export a range of data from an Excel worksheet to an HTML or web page file using the Save As command and VBA code. This method allows you to create a standalone HTML file that can be opened in any web browser, making it easy to share your data with others.

Export a Range of Data to HTML or Web Page File with Save As Command

If you want to export a range of data from Excel to HTML or web page file, one common method is to use the “Save As” function in Excel.

Here are the steps:

Step1: Select the range of data you want to export to HTML. You can select the cells by clicking and dragging the cursor over the cells.

How to export a range of data to HTML or web page file in Excel 1.png

Step2: Click on the “File” tab in the Excel ribbon. Click on “Save As“.

How to export a range of data to HTML or web page file in Excel 2.png

Step3: In the “Save As” dialog box, choose “Web Page” from the file type dropdown menu. Choose the location where you want to save the file and give it a name. Click on “Publish” button.

How to export a range of data to HTML or web page file in Excel 3.png

Step4: In the “Publish Options” section, select the “Selection” option to export only the selected range of cells. click Save button.

How to export a range of data to HTML or web page file in Excel 4.png

Step5: the Publish as Web Page dialog box will open, Click on the “Publish” button to export the range of data to an HTML file.

How to export a range of data to HTML or web page file in Excel 5.png

Step6: After completing these steps, the selected range of data will be exported to an HTML file that can be opened in a web browser.

Export a Range of Data to HTML or Web Page File with VBA Code

You can also export a range of data to an HTML file with VBA Code in Excel, and you can use the Application.InputBox function to select the range of data to export and prompt the user to select the destination directory and filename. Just do the following steps:

Step1: Press ALT + F11 on your keyboard to open the Visual Basic Editor (VBE).

Step2: In the VBE, click on the Insert menu and select Module. This will create a new module in your VBA project.

Step3: Copy the below VBA code and paste it into the module. Save your VBA project and close the VBE.

Sub ExportRangeToHTML_Excelgeek()

    Dim wb As Workbook
    Dim ws As Worksheet
    Dim rng As Range
    Dim htmlFile As String
    
    Set wb = ThisWorkbook
    Set ws = wb.ActiveSheet
     ' Prompt the user to select the range of data to export
    Set rng = Application.InputBox(prompt:="Select the range of data to export as HTML", Type:=8)
    
    ' Prompt the user to select the destination directory and filename
    htmlFile = Application.GetSaveAsFilename(fileFilter:="HTML Files (*.html), *.html")
    
    'Create a new workbook with the selected range of data and save it as an HTML file
    Dim newWb As Workbook
    Set newWb = Workbooks.Add
    rng.Copy
    newWb.Sheets(1).Range("A1").PasteSpecial xlPasteAll
    newWb.SaveAs htmlFile, xlHtml
    newWb.Close
    
    MsgBox "Selected range has been exported to " & htmlFile

End Sub

Step4: Press ALT + F8 on your keyboard to open the Macro dialog box. Select the ExportRangeToHTML_Excelgeek macro from the list and click the Run button.

vba to export a range of data to HTML or web page file in Excel 2.png

Step5: select the range of data to export in your current worksheet.

vba to export a range of data to HTML or web page file in Excel 3.png

Step6: choose a location to save the HTML file.

vba to export a range of data to HTML or web page file in Excel 4.png

Step7: Once the macro has completed, a message box will appear indicating that the selected range has been exported to the chosen location.

vba to export a range of data to HTML or web page file in Excel 5.png

You should now have an HTML file containing the data from the selected range.

Conclusion

Now you can quickly and easily export a range of data to an HTML file without having to manually copy and paste the data into a web page editor.

How to Copy Only Formatting from a Range to Another Range in Excel

When you want to ensure consistency in the formatting of a range of cells, copying only the formatting can be helpful. For instance, if you have a large spreadsheet with several rows and columns, you may want to ensure that all the cells have the same font, size, and color, which can be achieved by copying the formatting from one range to another. And copying formatting is a great time saver, it avoids errors when manually adjusting fonts and styles.

See the example below. We want the two “SALES” columns have the same range formatting. This post shares three methods including VBA code to copy only formatting from one range to another in Excel worksheet.

How to Copy Only Formatting from a Range to Another 1.png

Copy Only Formatting from a Range to Another by Format Painter Tool

Format Painter is useful in Excel and it can copy the style and formatting from a cell or a range and apply it on your destination cell or range in a quick way.

You can copy only the formatting from one range to another range by Format Painter tool in Excel by the following steps:

Step1: Select the cell that has the formatting you want to copy. In this example, the source range is B4:B8 which contains one number format and two background colors in cells.

Step2: Click on the “Format Painter” button in the “Home” tab of the Excel ribbon. The cursor will change to a paintbrush.

How to Copy Only Formatting from a Range to Another 2.png

Step3: Select the range of cells that you want to apply the formatting to. The copied range’s formatting will be applied to the entire destination range.

How to Copy Only Formatting from a Range to Another 3.png

Copy Only Formatting from a Range to Another by Paste Special -> Formatting Feature

You can also copy only formatting from a range to another by Excel “Paste Special” feature, this feature contains several “Paste” methods, and “Formatting” which copies only formatting and ignores the contents.

Here are the steps:

Step1: Select the cell or range that contains the formatting you want to copy.

Step2: Press “Ctrl + C” or right-click the selection and choose “Copy” from the context menu.

Step3: Select the cell or range where you want to apply the formatting.

Step4: Right-click the selection and choose “Paste Special” -> “Formatting” from the context menu.

How to Copy Only Formatting from a Range to Another 4.png

This will copy only the formatting from the original range to the destination range.

Copy Only Formatting from a Range to Another by Excel VBA Module

If you are familiar with Excel VBA, you can also copy only formatting from a range to another range in Excel using VBA code. Here are the steps:

Step1: Press Alt+F11 or click Visual Basic in Develop tab to open the Visual Basic Editor.

How to Copy Only Formatting from a Range to Another 5.png

Step2: In the VBE, select the opened sheet you want to run the VBA code, select “Insert” from the menu bar, then choose “Module“.

How to Copy Only Formatting from a Range to Another 6.png

Step3: Create VBA code.

How to Copy Only Formatting from a Range to Another 7.png

a. Define the source range and destination range by declaring two range variables using the “Range” object in VBA.

b. Use the “Copy” method of the source range object to copy the formatting only. This can be done by setting the “Paste Special” method to paste only the formatting.

c. Clear the clipboard to remove any copied data by using the “Application.CutCopyMode” method.

The complete VBA code should look like this:

Sub CopyFormattingOnly()
    Dim rngSource As Range
    Dim rngDestination As Range
    Set rngSource = Range("A1:D10") 'Change to your desired source range
    Set rngDestination = Range("F1:I10") 'Change to your desired destination range
    rngSource.Copy
    rngDestination.PasteSpecial xlPasteFormats
    Application.CutCopyMode = False
End Sub

Step4: Save the VBA code, close the editor and go back to the worksheet.

Step5: To run the macro, press Alt+F8 to open the Macro dialog box or click Macros in Developer tab.

How to Copy Only Formatting from a Range to Another 8.png

Step6: Select the macro you just created and click the Run button.

How to Copy Only Formatting from a Range to Another 9.png

Step7: After running the macro, the destination range is applied with the formatting properly.

How to Copy Only Formatting from a Range to Another 10.png

How to Copy Fill Color from One Cell to Another Cell or Range in Excel

Sometimes, you may fill some colors for cells based on certain conditions. You need to copy the filled color from one cell or range to another cell or range in the Excel worksheet. In this post, we introduce two ways to copy the fill color from a cell to other cells: Paste Special and VBA Code. You can choose a way you like to apply it in your Excel worksheet.

Example:

How to Copy Fill Color from One Cell to Another Cell or Range in Excel 1.png

Copy Fill Color by “Paste Special” Function

The Paste Special function provides the ability to paste only values, formatting, formulas, etc. In this example, we can apply the Paste Special -> Formatting function to paste the copied color.

Here are the steps:

Step1: Select the cell you want copy the fill color. For example, select cell B3.

Step2: Right click and select “Copy” in the menu.

Step3: Select range F4:F5 you want to fill the color.

Step4: Right click and select “Paste Special” -> “Formatting” in the menu.

How to Copy Fill Color from One Cell to Another Cell or Range in Excel 2.png

Step5: Then cells in the range F4:F5 are filled with the copied color.  

Copy Fill Color by VBA Code

If you are skilled and familiar code editing in Excel VBA, you can copy a filled color from one cell and apply it to a range of cells using VBA in Excel. Here’s an example code that copies the color from cell B3 and pastes it to a range of cells from F4 to F5:

Step1: Press Alt+F11 or click Visual Basic in Develop tab to open the Visual Basic Editor (VBE).

How to Copy Fill Color from One Cell to Another Cell or Range in Excel 3.png

Step2:. In the VBE, select the opened sheet you want to run the VBA code, right click and select Insert -> Module in the menu to create a new module.

How to Copy Fill Color from One Cell to Another Cell or Range in Excel 4.png

Step3: In the module, type your VBA code.

How to Copy Fill Color from One Cell to Another Cell or Range in Excel 5.png
Sub CopyColor()
    ' Copy the fill color from cell B3
    Dim myColor As Long
    myColor = Range("B3").Interior.Color

    ' Paste the color to the range from F4 to F5
    Range("F4:F5").Interior.Color = myColor
End Sub

The Interior.Color property is used to get and set the fill color of a cell. In the code above, the color from cell B3 is stored in the myColor variable using the Interior.Color property. Then, the color is pasted to the range F4:F5 using the same property. You can modify the range in the code above to match your specific needs.

Step4: Save the VBA code, close the VBE and go back to the worksheet.

Step5: To run the macro, press Alt+F8 to open the Macro dialog box or click Macros in Developer tab.

How to Copy Fill Color from One Cell to Another Cell or Range in Excel 6.png

Step6: Select the macro you just created and click the Run button.

How to Copy Fill Color from One Cell to Another Cell or Range in Excel 7.png

Step7: Color is copied from B3 and filled to F4:F5 properly.

How to Copy Fill Color from One Cell to Another Cell or Range in Excel 8.png

Conclusion

These two methods are easy to understand and can help us copy colors easily without knowing the RGB of the cell fill color. You can apply either of the methods in this post according to your actual situation.

How to Copy a Cell to Clipboard with VBA Code

Copying a cell with a single click can save time and effort compared to using the traditional copy and paste method. This is particularly useful if you frequently need to copy data from a particular cell or range of cells. With the automatic copy feature, you can avoid the risk of accidentally copying the wrong data or overwriting existing data in your worksheet. This post provides a tip on one-click copying in Excel via VBA code.

One-Click Copy by Excel VBA Code

If you are not familiar with the VBA code, you can use the following VBA code to copy the value of a cell to the clipboard with a single click:

Private Sub Worksheet_SelectionChange(ByVal Target As Range)
    If Target.Cells.Count = 1 Then
        If Not Application.Intersect(Target, Range("A1:B10")) Is Nothing Then 
            Selection.Copy 
        End If
    End If
End Sub

In this code, “Worksheet_SelectionChange” is a built-in event in Excel VBA that is triggered whenever a cell is selected in the worksheet.

The “If” statement checks if only one cell is selected, so that the code only runs when a single cell is clicked.

The “Application.Intersect” function is used to check if the selected cell is within the specified range (A1:B10 in this example). If the selected cell is within the range, then the value of the selected cell is copied using the “Selection.Copy” method.

Here are the complete steps to use this code in your Excel workbook:

Step1: Press Alt + F11 to open the Visual Basic Editor. Or click the Visual Basic of Developer tab in the ribbon.

How to One-Click Copy a Cell Automatically by Single Click in Excel 1.png

Step2: In the Visual Basic Editor window, select the worksheet where you want to enable the copy action.

Step3: Right-click the worksheet and insert module by select “Insert” -> “Module” in the menu.

How to One-Click Copy a Cell Automatically by Single Click in Excel 2.png

Step4: Copy and paste the code above into the code window.

How to One-Click Copy a Cell Automatically by Single Click in Excel 3.png

Step5: Save the workbook and close the Visual Basic Editor.

Now, when you click on any cell in the worksheet, its value will be copied to the clipboard automatically. Select a cell where you want to paste the copied cell, press Ctrl+V to paste the content saved in the cell.

If you want to remove the restriction on one cell, you can remove the “if” statement about checking that a cell is selected. You can use the following VBA code to copy a range by single click/select.

Private Sub Worksheet_SelectionChange(ByVal Target As Range)
        If Not Application.Intersect(Target, Range("A1:B10")) Is Nothing Then 
            Selection.Copy 
        End If
End Sub

How to Copy a Selected Range to New Workbook in Excel

If you work with large amounts of data in Excel, it is likely that you have needed to copy a selected range of cells to a new workbook at some point. While you can manually copy and paste the range, this process can be time-consuming and error-prone, especially if you need to repeat the task frequently.

Fortunately, there are several ways to automate the process of copying a selected range to a new workbook in Excel. In this post, we will introduce two methods to achieve this task – the first one is the manual method, and the second one is using VBA code with Application.InputBox to select the range.

Copy a Selected Range to a New Workbook Manually

If you want to copy a selected range to a new workbook manually in Excel , you can follow these steps:

Step1: Select the range of cells you want to copy.

How to copy a selected range to a new workbook in Excel1.png

Step2: Press Ctrl + C on your keyboard to copy the selected range.

Step3: Click on the File tab in the ribbon menu, then select New to create a new workbook.

Step4: In the new workbook, click on the first cell where you want to paste the copied range.

How to copy a selected range to a new workbook in Excel2.png

Step5: Press Ctrl + V on your keyboard to paste the copied range.

Copy a Selected Range to a New Workbook with VBA Code

You can also use the VBA Code to copy a selected range to a new workbook in Excel, it will use the Application.Inputbox function to select the range. Just do the below steps:

Step1: Open the Excel workbook that contains the range you want to copy.

Step2: Press Alt + F11 on your keyboard to open the Visual Basic Editor.

Step3: In the Visual Basic Editor, click on Insert from the top menu and select Module to insert a new module.

Step4: Copy and paste the VBA code provided in the module.

vba to copy a selected range to a new workbook in Excel1.png
Sub CopyRangeToNewWorkbook_excelgeek()
    Dim myRange As Range
    Dim newWorkbook As Workbook
    
    'Prompt user to select range to copy
    Set myRange = Application.InputBox(prompt:="Select the range to copy", Type:=8)
    
    'Create a new workbook
    Set newWorkbook = Workbooks.Add
    
    'Copy the selected range to the new workbook
    myRange.Copy Destination:=newWorkbook.Sheets(1).Range("A1")
    
    'Activate the new workbook
    newWorkbook.Activate
End Sub

Step5: Press F5 or Run from the top menu to run the macro.

vba to copy a selected range to a new workbook in Excel2.png

Step6: In the pop-up window, select the range you want to copy by clicking and dragging your mouse over the cells. Click on the OK button to start the macro.

vba to copy a selected range to a new workbook in Excel3.png

Step7: Excel will create a new workbook and copy the selected range to the new workbook.

vba to copy a selected range to a new workbook in Excel4.png

How to Save an Excel Table as Image in Excel

This tutorial will introduce three methods for saving an Excel table as an image in Excel: “Paste as picture”, “Paint tool”, and “VBA code“.

The Paste as picture method allows you to create a picture of a range that can be easily inserted into documents or presentations.

The Paint tool method uses the built-in Windows Paint program to save the selected range as an image.

The VBA code method automates the process of saving the selected range as an image using Visual Basic for Applications (VBA) code.

Save Table as Image using Paste as Picture

You can save an Excel table as an image using the “paste as picture” feature. Here are the steps:

Step1: Select the table that you want to save as an image.

How to Save an Excel Table as Image in Excel 1.png

Step2: Right-click on the selected cells and choose “Copy” from the context menu or press Ctrl+C on your keyboard.

How to Save an Excel Table as Image in Excel 2.png

Step3: select one destination cell to place the image.  Then click the Home tab, click on the drop-down menu list from the Paste option in the Clipboard group.  Click on the Picture option.

How to Save an Excel Table as Image in Excel3.png

Now you can simply copy the image and paste it to other application.

Save Table as Image using Paint Tool

You can save an Excel table as an image using the Paint tool in Windows. Here are the steps:

Step1: Select the table that you want to save as an image.

Step2: Right-click on the selected cells and choose “Copy” from the context menu or press Ctrl+C on your keyboard.

Step3: Open the Paint tool by typing “Paint” in the Windows search bar and selecting the app from the search results.

Step4: In Paint, choose “Paste” from the “Home” tab or press Ctrl+V on your keyboard to paste the copied table into the canvas.

How to Save an Excel Table as Image in Excel4.png

Step5: Choose “Save As” from the “File” menu and select the desired file format (e.g. JPEG, PNG, BMP, etc.).

How to Save an Excel Table as Image in Excel5.png

Step6: Enter a file name and choose a save location. Click “Save” to save the image.

How to Save an Excel Table as Image in Excel6.png

Save Table as Image with VBA Code in Excel

You can use VBA code in Excel to save a selected table as an image and prompt the user to select a destination to save the image. Just do the following steps:

Step1: Open your Excel workbook.

Step2: Press Alt + F11 to open the VBA editor.

Step3: In the VBA editor, select Insert from the menu bar, then choose Module to create a new module.

Step4: Copy the VBA code I provided and paste it into the new module. Save the workbook and close the VBA editor.

vba to Save an Excel Table as Image in Excel 1.png
Sub sleep(T As Single)
    Dim time1 As Single
    time1 = Timer
    Do
        DoEvents
    Loop While Timer - time1 < T
End Sub
Sub SaveTableAsImage_excelgeek()
    Dim tbl As Range
    Dim savePath As String, fileName As String, fileFormat As String
    Dim cht As ChartObject
      
    'Prompt the user to select the table to save as an image
    Set tbl = Application.InputBox("Select the table to save as an image:", Type:=8)

    tbl.CopyPicture xlScreen, xlPicture
 
     'prompt user for save location and file name
    savePath = Application.GetSaveAsFilename(InitialFileName:="table1", _
        FileFilter:="JPEG (*.jpg), *.jpg, PNG (*.png), *.png")
    If savePath = "False" Then Exit Sub ' exit if user clicks cancel
     
    'extract file name and format from save path
    fileName = Mid(savePath, InStrRev(savePath, "\") + 1)
    fileFormat = Mid(fileName, InStrRev(fileName, ".") + 1)
    fileName = Left(fileName, InStrRev(fileName, ".") - 1)
    
    
    'create temporary chart object, set dimensions to table dimensions, paste table inside, and save as image
    Set cht = ActiveSheet.ChartObjects.Add(0, 0, tbl.Width, tbl.Height)
    Call sleep(2)
    cht.Chart.Paste
    cht.Chart.Export savePath, fileFormat
    cht.Delete
    Application.CutCopyMode = False
    
End Sub

Step5: Press Alt + F8 to open the Macros dialog box. Select the SaveTableAsImage_excelgeek macro from the list and click the Run button.

vba to Save an Excel Table as Image in Excel 2.png

Step6: Select the table to save as an image.

vba to Save an Excel Table as Image in Excel 3.png

Step7: select one the location to place image.

vba to Save an Excel Table as Image in Excel 4.png

Step8: The picture will be saved into the selected location.

vba to Save an Excel Table as Image in Excel 5.png

Conclusion

There are several methods available for saving an Excel table as an image, each with its own advantages and limitations. The “Paste as picture” method is quick and easy, but may result in lower image quality. The “Paint tool” method provides greater control over image quality, but requires an extra step. The “VBA code” method offers the most automation and customization options, but may require some programming knowledge.

How to Copy and Paste Range or Chart object as Picture in Excel

This post will introduce two methods to copy and paste a range or chart object as a picture in Excel. The first method involves using Excel’s built-in “Copy as Picture” feature, while the second method uses VBA code to automate the process.

The VBA code method will select a range or chart object using Application.Inputbox function and choose a destination cell for the picture. The VBA code will then copy the range or chart object as a picture and paste it into the specified cell.

Copy and Paste Range or Chart object as Picture using Copy as Picture

You can use the “Copy as Picture” feature in Excel to copy a range or chart object as a picture. Here are the steps:

Step1: Select the range or chart object that you want to copy as a picture.

How to Copy and Paste Range or Chart object as Picture in Excel 1.png

Step2: Go to the “Home” tab in the Excel Ribbon. Click the drop-down arrow next to the “Copy” button in the “Clipboard” section. Select “Copy as Picture” from the drop-down menu. The Copy Picture dialog box will open.

How to Copy and Paste Range or Chart object as Picture in Excel 2.png

Step3: In the “Copy Picture” dialog box, select the Format as Picture, and select Appearance as shown on screen.

How to Copy and Paste Range or Chart object as Picture in Excel 3.png

Step4: Click the “OK” button to copy the range or chart object as a picture.You can paste the picture wherever you want by pressing “Ctrl + V” on the keyboard.

How to Copy and Paste Range or Chart object as Picture in Excel 4.png

Copy and Paste Range or Chart object as Picture with VBA Code

You can also use the VBA Code to copy a range or chart object and paste it in your Excel worksheet, just do the following steps:

Step1: Open your Excel workbook.

Step2: Press Alt + F11 to open the VBA editor.

Step3: In the VBA editor, select Insert from the menu bar, then choose Module to create a new module.

Step4: Copy the VBA code I provided and paste it into the new module. Save the workbook and close the VBA editor.

vba Copy and Paste Range or Chart object as Picture in Excel 12.png
Sub CopyAsPicture_excelgeek()
    Dim rng As Range
    Dim chartObj As ChartObject
    Dim destCell As Range
    
    'Prompt user to select range or chart object
    On Error Resume Next
    Set rng = Application.InputBox("Select a range or chart object to copy as picture", Type:=8)
    On Error GoTo 0
    
    'If user selects a range, copy it as picture
    If Not rng Is Nothing Then
        rng.CopyPicture xlScreen, xlPicture
        
        'Prompt user to select destination cell
        On Error Resume Next
        Set destCell = Application.InputBox("Select destination cell to place picture", Type:=8)
        On Error GoTo 0
        
        'If user selects a cell, paste the picture and adjust its size
        If Not destCell Is Nothing Then
            With destCell.Parent.Pictures.Paste
                .Left = destCell.Left
                .Top = destCell.Top
                .Width = rng.Width
                .Height = rng.Height
            End With
        End If
    'If user selects a chart object, copy it as picture
    ElseIf ActiveChart Is Nothing Then
        MsgBox "Please select a range or chart object."
    Else
        Set chartObj = ActiveSheet.ChartObjects(ActiveChart.Parent.Name)
        chartObj.Chart.Export Environ$("temp") & "\temp.png", "PNG"
        With destCell.Parent.Pictures.Insert(Environ$("temp") & "\temp.png")
            .Left = destCell.Left
            .Top = destCell.Top
            .Width = chartObj.Width
            .Height = chartObj.Height
        End With
        Kill Environ$("temp") & "\temp.png"
    End If
End Sub

Step5: Press Alt + F8 to open the Macros dialog box. Select the CopyAsPicture_excelhow macro from the list and click the Run button.

vba Copy and Paste Range or Chart object as Picture in Excel 13.png

Step6: Select the cell where you want to paste the picture.

vba Copy and Paste Range or Chart object as Picture in Excel 3.png

Step7: select one the destination cell to place picture.

Step8: The picture will be pasted into the selected cell.

vba Copy and Paste Range or Chart object as Picture in Excel 5.png

How to Convert Range to Image in Excel

This post will introduce you to two methods of converting a range of cells to an image in Excel. The method involves using the “Copy As Picture” feature in Excel and a VBA code to export the copied range as an image file.

Convert Cells Range to Image Using Copy as Picture Feature

If you want to convert a range of cells to an image in Microsoft Excel Spreadsheet, you can use the built-in “Copy As Picture” feature. Here are the steps:

Step1: Select the cells range that you want to convert to an image.

Step2: Press the “Ctrl + C” shortcut on your keyboard to copy the cells range to the clipboard.

How to convert cells range to image in Excel 1.png

Step3: Click on the “Home” tab in the ribbon. Click on the “Copy” dropdown arrow in the “Clipboard” group, and then select “Copy as Picture“. The Copy Picture dialog box will open.

How to convert cells range to image in Excel 2.png

Step4: In the “Copy Picture” dialog box, select the “As shown on screen” option and the “Picture” format. Click on the “OK” button.

How to convert cells range to image in Excel 3.png

Step5: Now you can paste the copied cells range as an image in another location. For example, you can open an image editor (such as Microsoft Paint), and press the “Ctrl” and “V” keys on your keyboard to paste the image.

How to convert cells range to image in Excel4.png

Convert Cells Range to Image with VBA Code

You can also use VBA code to automate the process of converting a range of cells to an image. Just do the following steps:

Step1: Open your workbook that contains the range of cells you want to convert to an image.

Step2: Press Alt + F11 to open the Visual Basic Editor.

Step3: In the Visual Basic Editor, click on Insert > Module to create a new module.

Step4: Copy the below VBA code and paste it into the new module.

vba to convert cells range to image in Excel 1.png
Sub ConvertRangeToImage_excelgeek()
    Dim MyChart As ChartObject
    Dim MyRange As Range
    Dim DestPath As String
    Dim FileName As String
    
    Set MyRange = Application.InputBox("Select the range of cells:", Type:=8)
    MyRange.CopyPicture xlScreen, xlPicture
    
    Set MyChart = ActiveSheet.ChartObjects.Add(0, 0, MyRange.Width, MyRange.Height)
    
    MyChart.Activate
    MyChart.Chart.Paste
    DestPath = Application.GetSaveAsFilename(InitialFileName:="MyImage", _
        FileFilter:="PNG Files (*.png), *.png, JPEG Files (*.jpg), *.jpg, GIF Files (*.gif), *.gif, BMP Files (*.bmp), *.bmp", _
        Title:="Save As")
    If DestPath <> "False" Then
        FileName = Mid(DestPath, InStrRev(DestPath, "\") + 1)
        MyChart.Chart.Export DestPath, Mid(DestPath, InStrRev(DestPath, ".") + 1)
    End If
    MyChart.Delete
End Sub

Step5: Save the module and close the Visual Basic Editor. Press Alt + F8 to open the Macro dialog box.Select the ConvertRangeToImage_excelgeek macro from the list of available macros and click Run.

vba to convert cells range to image in Excel 2.png

Step6: select the range of cells you want to convert to an image.

vba to convert cells range to image in Excel 3.png

Step7: The code will prompt you to choose the destination folder and image name for the converted image.

vba to convert cells range to image in Excel 4.png

Step8: Once you select the destination folder and image name, the code will export the range of cells as an image file in the selected format.

vba to convert cells range to image in Excel 5.png

Conclusion

 With the above methods, you can easily convert any range of cells in your Excel worksheet to a PNG, JPG or other image format, which can be useful for sharing data, creating reports, or including the data in a presentation.