This post will guide you on how to export all images at once from Excel. However, exporting these images can be time-consuming, especially if you have many images spread across different worksheets. This post you will learn how to export all images at once from Excel, saving you time and effort.
Export All Images at Once From Excel Worksheet
If you want to export all images at once from your active workbook in Excel, and you can do the following steps:

Step1: Click on the “File” tab in Excel and select “Save As“.

Step2: In the “Save As” dialog box, select the folder where you want to save the images. Choose “Web Page” from the “Save as type” dropdown menu.

Step3: Check the box next to “Save:” and select “Entire Workbook” radio button, and click on the “Save” button.

Step4: Navigate to the folder where you saved the file, you should see a folder named “xxxxx_files” or something similar. Open that folder.

Step5: All of the images from the Excel file should be in that folder. You can then copy or move the images to another folder as needed.

Export Images and Rename Them with the Adjacent Cell Values
If you want to export images and rename them with the adjacent cell values, and you can use VBA code to achieve the result, just do the following steps:
Step1: you can press Alt +F11 shortcut to open the Microsoft VBA editor.
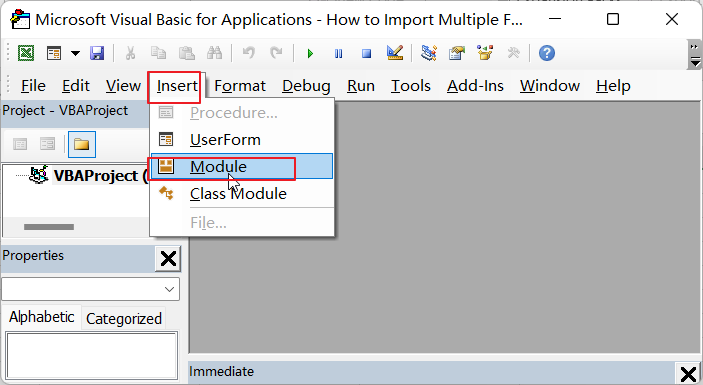
Step2: In the Microsoft VBA editor, insert a new module by clicking “Insert” -> “Module” from the drop-down menu list.
Step3: copy and paste the following VBA code into the new module window.

Sub ExportImages_excelgeek()
    Dim cell As Range
    Dim shp As Shape
    Dim chartObj As ChartObject
    Dim path As String
    Dim fileName As String
    Dim fd As FileDialog
    Dim xImg As Shape

    path = "C:\Users\Images\" 'Change the path to your desired location

    Set fd = Application.FileDialog(msoFileDialogFolderPicker)
    fd.AllowMultiSelect = False
    fd.Title = "Select a folder to save images"
    If fd.Show = True Then
        path = fd.SelectedItems(1) & "\"
    Else
        Exit Sub
    End If

    For Each oneImg In ActiveSheet.Shapes
        If oneImg.Type = msoPicture Then
            fileName = oneImg.TopLeftCell.Offset(0, -1).Value & ".jpg" 'Change the offset to match the adjacent cell where the name is located
            If fileName <> "" Then
                oneImg.Select
                Selection.Copy
                 With ActiveSheet.ChartObjects.Add(0, 0, oneImg.Width, oneImg.Height)
                     .Activate
                     ActiveChart.Paste
                     .Chart.Export path & fileName
                     .Delete

                End With
            End If
        End If
    Next
End Sub
Step4: Modify the offset value to match the adjacent cell where the name is located.
Step5: Press “F5” to run the VBA code or press “Alt + F8” to open Macro dialog box, and select “ExportImages_excelgeek” Macro name, then click on Run button.

Step6: select a folder to save images, click on Ok button.

Step7: The code will loop through each image in the current worksheet, copy it, and export it as a JPEG file with the name from the adjacent cell.
